|
|
| |
| |
(001) 1place - Quick Start Guide for Sales & Customer Service Personnel
| Author: Steve Childs Reference Number: AA-02755 Created: 2020-07-29 14:51 Last Updated: 2024-06-15 11:29 |
0 Rating/ Voters
|
 |
Summary1place.cloud is an all-in-one-place to help your company manage your Customers, Sales Orders, Inventory, and Warehouse. This Quick Start Guide has been designed for people who will use 1place to do Sales and/or Customer Service.
Help Topics
NOTE: If cannot click on the links (because you have printed out this article) please visit www.youtube.com in the search bar type: 1place . cloud (be sure to put in the spaces).
|
Video # |
Category |
Topic |
Length |
YouTube Keyword |
|
001.0 |
Overview & Setup |
Quick Start: Learn 50% of 1place in less than 10 min |
6 min, 58 sec |
1place-001.0 |
|
001.1 |
Overview & Setup |
Quick Start: Using the Find Parts screen. How to find, price and sell parts. (For Auto Body Supply) |
11 min, 07 sec |
1place-001.1 |
|
001.1b |
Overview & Setup |
Quick Start: Using the Find Parts screen. How to find, price, and sell parts. (For Wholesale Distribution) |
|
|
|
001.2 |
Overview & Setup |
Quick Start: How to Print & Customize Invoices, Picking Tickets, etc. |
7 min, 25 sec |
1place-001.2 |
|
001.3 |
Overview & Setup |
How to Setup & Manage Users |
10 min, 19 sec |
1place-001.3 |
|
101.1 |
Sales |
How to create Customers. |
6 min, 06 sec |
1place-101.1 |
|
101.2 |
Sales |
How to create Items (Parts). |
14 min, 58 sec |
1place-101.2 |
|
101.3 |
Sales |
How to create Quotes. |
2 min, 39 sec |
1place-101.3 |
|
101.4 |
Sales |
How to create Sales Orders. |
3 min, 30 sec |
1place-101.4 |
|
101.5 |
Sales |
How to create Invoices. |
8 min, 40 sec |
1place-101.5 |
|
101.5a |
Sales |
How to receive payments. |
|
|
|
101.6 |
Sales |
How to create Credit Memo’s (or Return Authorizations). |
7 min, 50 sec |
1place-101.6 |
|
102.1 |
Sales |
How to automatically price parts using a Default Pricing Method. |
9 min, 22 sec |
1place-102.1 |
|
102.2 |
Sales |
How to automatically price parts using Custom Pricing. |
6 min, 32 sec |
|
|
102.3 |
Sales |
How to set up sales taxes codes in OneSource. |
|
|
|
103.0 |
Warehouse Management |
Overview of the Shipping & Receiving Screen. |
7 min, 18 sec |
1place-103.0 |
|
103.1 |
Warehouse Management |
How to Use the Shipping & Receiving Screen to PICK Parts. |
14 min, 32 sec |
1place-103.1 |
|
103.2 |
Warehouse Management |
How to use the Shipping & Receiving screen to Dispatch Parts |
|
|
|
103.3 |
Warehouse Management |
How to use the Shipping & Receiving screen to Re-Dispatch Parts |
|
|
|
103.4 |
Warehouse Management |
How to buy, setup, and use the osScan system |
|
|
|
104.1 |
Purchasing Items |
How to create Purchase Orders |
16 min, 01 sec |
1place-104.1 |
|
104.2 |
Purchasing Items |
How to use the Sales Order POs Screen |
18 min, 37 sec |
1place-104.2 |
|
|
|
|
|
- Open your web browser and go to www.youtube.com
- In the YouTube search field type the YouTube Keyword (as shown in the table above). For instance:
- To open the 'QuickStart: Learn 50% of 1place in less than 10 minutes' video, simply type 1place-001.0 in the YouTube search field. (Please refer to the 1st row in the table of video's above).
Click Here to view the video on YouTube. (Or open YouTube and type: 1place-001.0 in the search bar.)
- Open up your Google Chrome browser and navigate to: osqbo.com. Enter your email and password. Click Sign In.
- Click on the
 button on ANY screen, or button on ANY screen, or - Visit www.1place.cloud/help, or
- Talk to your company's 1place admin. (Your onsite 1place guru)
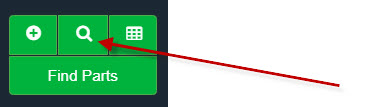
MOST of your tasks can be completed using the 4 GREEN Quick Start buttons:
The MAIN Menu bar on the left side of the screen provides a way to open virtually all of the screen you will use to perform your job.
- Click the
 button (in the top left corner) and select the type of record you want to add, or button (in the top left corner) and select the type of record you want to add, or
- Click on the
 at the bottom of a drop down list (when you cannot find the value in the drop down list), or at the bottom of a drop down list (when you cannot find the value in the drop down list), or - Click on the
 button on any screen (to add a record of similar type), or button on any screen (to add a record of similar type), or - Press a keyboard shortcut, such as Ctrl+F3, or Ctrl+F4, etc. (You can see a list of keyboard shortcuts ON THE RIGHT SIDE of the drop down list when you click the button).
Click Here to view the video on YouTube. (Or open YouTube and type: 1place-101.1 in the search bar.)
Click Here to view the video on YouTube. (Or open YouTube and type: 1place-101.3 in the search bar.)
Click Here to view the video on YouTube. (Or open YouTube and type: 1place-101.4 in the search bar.)
- Whenever the
 button turns RED that means there is unsaved data. In most cases this button gets pressed automatically for you. button turns RED that means there is unsaved data. In most cases this button gets pressed automatically for you.
- OPTION 1 - Quick Start Magnifying Glass Button: Click the
 button (in the top left corner) and select the type of record you want to find. button (in the top left corner) and select the type of record you want to find.
- OPTION 2 - Function Keys. You can press any of the FUNCTION keys on your keyboard (as show in blue below).
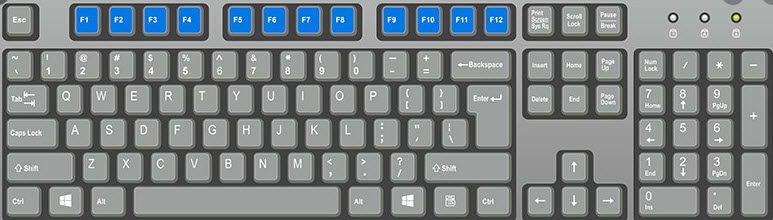
Press F1 to find a List of Parts (by Year, Make, Model, item #, OEM#, Partslink #, etc)
Press F2 to find a Job record.
Press F3 to find a Customer record.
Press F4 to find a Vendor record.
Press F5 to find a Quote record.
Press F6 to find a Sales Order record.
Press F7 to find an Invoice record.
Press F8 to find a Credit Memo record.
Press F9 to find a Purchase Order (PO) record.
Press F10 to find an Item record.
NOTE: When you click the button you can see the Shortcut list above in the drop down list (on the right side).
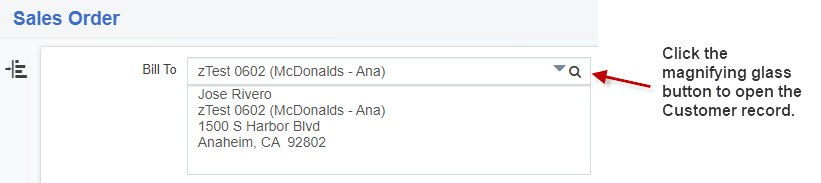
- OPTION 3 - Magnifying Glass Button. You can click on the
 button next to any record (to open the record detail screen). button next to any record (to open the record detail screen).
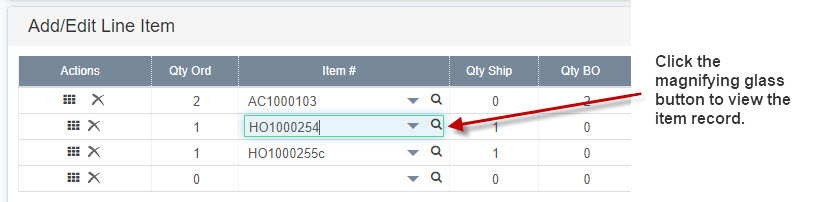
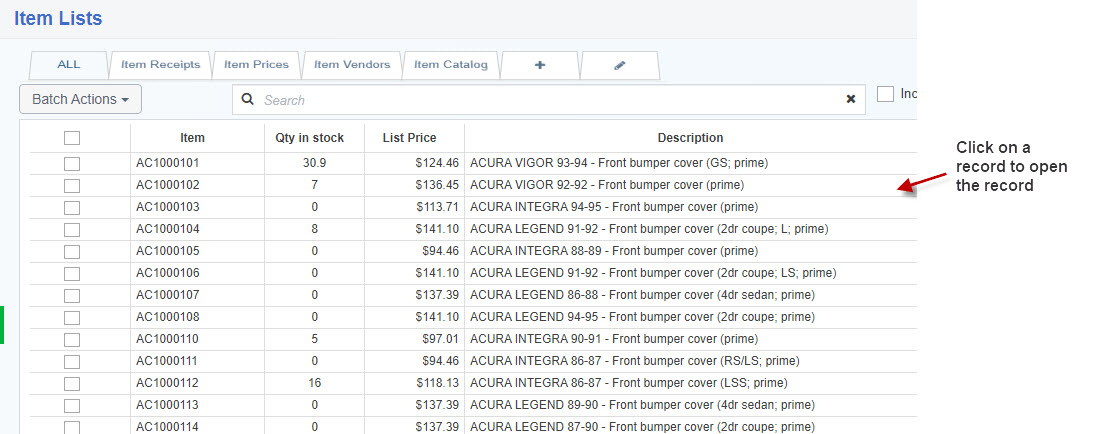
- OPTION 4 - Click a Record on a List Screen.
Click Here to view the video on YouTube. (Or open YouTube and type: 1place-001.2 in the search bar.)
00:01 - Print Sales Orders, Picking Tickets, Packing Slips (on the Sales Order screen).
01:30 - Customizing a Printable Invoice.
04:55 - Emailing an Invoice (using an Email auto fill template).
05:58 - Overview of batch creating & printing Invoices on the Shipping & Receiving screen.
- Click on Print button on any screen.
 - Printing Options pop-up screen will appear.
- Input the Qty of Pages to Print.
- Select Document(s) to Print (drop down button).
- To Remove, click on the X button under the Properties.
- To Edit the Print Settings, click on the Gear button beside the X button.
- You will see different Print Settings and Properties which you can edit according to your preferences.
- Click Save.
- Click on Print on the lower right side of the popup screen and it will direct you to the Document Preview page.
- On the Document Preview page, you can either download the document or directly print the page (upper right part of the screen).
- (Note: Some records--like Sales Orders, Invoices, etc PRINT PREVIEW in the browser. If you want to Print from the Print Preview screen click on the
 in the top right corner. in the top right corner.
- Click on the
 button on any screen. button on any screen. - On the Send Email popup, input in the quantity of records you want to print under the Qty field.
- Select Document(s) to print on the drop down button.
- Click on the Preview Email button on the bottom right of the popup screen.
- On the left pane of the Email popup screen shows the email recipients and the message body that will also let you create a template for your emails.
- On the right pane, shows the attachments that will be sent to the customer. This will also let you download and print the document(s).
- To edit the template, click on the Edit Template button on the bottom left.
- To send the email, click on the blue Send Email button on the bottom right.

- Click the
 button on the bottom of the screen. (Note: Some records cannot be deleted, such as Customers that have Sales Transactions, or Items used on Sales Transactions or PO's). button on the bottom of the screen. (Note: Some records cannot be deleted, such as Customers that have Sales Transactions, or Items used on Sales Transactions or PO's). - For batch deletion, go to the transaction screen (Quotation, Sales Orders, Invoices or Purchase Order)
- Check the box on the left of the record you want to delete.
- Click on the Batch Actions button then click on the Delete Selected.
- A prompt will ask you to confirm if you want to delete the record(s). Type in YES to confirm then click OK.
- On any Transaction screen (Quotation, Sales Orders, Invoices or Purchase Order) under the Add/Edit Line Item section, click the
 button to delete line item(s) from that Transaction. button to delete line item(s) from that Transaction.
Click Here to view the video on YouTube. (Or open YouTube and type: 1place-001.1 in the search bar.)
- Press the F1 key on your keyboard (or click on the
 button). button). - Input Ship To address (from the drop down button).
- Note: If Customer is not in the drop down list and you want to add that Customer to your database, click +Add New located at the bottom part of that list.
- Input Bill To address (from the drop down button).
- Fill in the Search Filters as follows:
- Input the two-digit Year of the vehicle.
- Input Make using the drop down button.
- Input Model using the drop down button.
- (If desired) To narrow down your search:
- Select a Category of the part (from the drop down button).
- Select a Sub-Category of the part (from the drop down button).
- You may enter a part 'keyword' in the Description field (or leave it blank).
- You may enter a Part Number (or leave it blank). NOTE: The part # could be YOUR part #, an OEM part #, a Vendor part #, etc... It is an all-inclusive part # search.
- Click on Search (green button).
- A list of Items will show below the Search Filters.
- Select the item by checking the box on the X column. Input quantity of the item under Qty field.
- Note: The item selected (or checked) will be retained on top of the item display list. This makes it easy for you if you need to change the Search Filters to add another item or more.
- Once done selecting the items with the corresponding quantities, you may create a Quote by clicking on the Add To Quote button on the footer (bottom left) or create a Sales Order by clicking on the Add To Sales Order button.
- You can also add additional parts to the Quote or Sales Order you just created.
- On the Add/Edit Line Item table section (last row that is empty), click on the Item# drop down icon to select a particular line item. Input the Quantity Order then click Commit Line Item. Click Save.
- Next Steps. Now you can...
- Print the Quote or Sales Order by clicking on the Print button.
- Email the Quote or Sales Order by clicking on the Email button.
- Close the Quote or Sales Order by clicking on the Close button.
- Start a new Find Parts search by clicking New button (bottom left). This will open up a new blank Find Parts screen.
- Find a previous Quote or Sales Order.
- Open an Item Detail screen.
- Press F10 then select an item, or
- Click on Items (on Main Menu bar) then click on any item on the list.
- On the Item Detail screen, click on Sales tab.
- Click on Sales Orders button and Quotations button to view previous Quotes and Sales Orders related to that item.
- Apply a Deposit Payment on a Sales Order
- On the Sales Order screen, click on the Payment Info tab then click on the Receive/Edit Payment(s) button.
- The Payments popup screen will show.
- Click on the drop down icon to select the Payment Method. Input other related details when necessary.
- Input the Deposit Amount in the Amount Tendered box.
- Click on Apply Payment.
- Note: You cannot add or edit any payments on the Sales Order that has already been invoiced.
- Create an Invoice
- On the Sales Order screen, click on Create Invoice button (below, center).
- The system automatically fills up the Invoice# box (upper right of the Sales Order screen) after creating the Invoice. (If you click on the Magnifying Glass button next to it, the related Invoice will be displayed.)
- Apply a Payment to an Invoice
- On the Invoice screen, click on the Payment Info tab then click on the Receive/Edit Payment(s) button.
- The Payments popup screen will show.
- Note: If previous payments have been made (i.e. deposit payment on the Sales Order transaction), this popup automatically shows the sum total of payments on the Total Prev Payments box as well as the Amount Due.
- Click on the drop down icon to select the Payment Method. Input other related details when necessary.
- Input the Amount Tendered.
- Note1: The system automatically fills the Amount Tendered box (which is the amount still due) but you may edit accordingly. Click on Apply Payment button.
- Note: A 'PAID' stamp will appear beside the Receive/Edit Payment(s) table when the Invoice is fully paid.
- Press F3 (or click the button and then click Customer).
- On the Customer Details screen, click on the Sales History tab, and then click on any of the buttons that display a list of Quotations, Quotation Line Items, Sales Orders, etc...
- Note: You can open any of the sales transaction by clicking on the selected transaction.
If you need to find a Quote
- Press F5 (or click the button > Quotes).
- On the Quick Search pop-up screen, click on the drop down button for the Search By filter and select Number (Quote Number).
- The Quote List table will then show all Quotes by Quote Number on the first column.
- Note: You can also select many different ways to search a Quote (by clicking on the drop down icon under Search By filter). You can search by Amount, Bill To Company, Ship TO Company, Quote Date, etc.
If you need to find a Sales Order
- Press F6 (or click the button > Sales Orders).
- On the Quick Search pop-up screen, click on the drop down button for the Search By filter and select Number (Sales Order Number).
- The Sales Order List table will then show all Sales Orders by Sales Order Number on the first column.
- Note: You can also select many different ways to search a Sales Order (by clicking on the drop down icon under Search By filter). You can search by Date of Sales Order, PO Number, Line Item Info, etc.
If you need to find an Invoice
- Press F7 (or click the button > Invoices).
- On the Quick Search pop-up screen, click on the drop down button for the Search By filter and select Number (Invoice Number).
- The Invoice List table will then show all Invoices by Invoice Number on the first column.
- Note: You can also select many different ways to search an Invoice (by clicking on the drop down icon under Search By filter). You can search by Company (Ship To), Date of Invoice, PO Number, Line Item Info, etc.
If you need to find a Credit Memo
- Press F8 (or click the button > Credit Memos).
- On the Quick Search pop-up screen, click on the drop down button for the Search By filter and select Number (Credit Memo Number).
- The Credit Memo List table will then show all Credit Memos by Credit Memo Number on the first column.
- Note: You can also select many different ways to search a Credit Memo (by clicking on the drop down icon under Search By filter). You can search by Date of Credit Memo, PO Number, Line Item Info, etc.
- Open up a Customer record. On the Customer Details screen, click on Custom Pricing tab.
- Note: There are many ways to set up customer prices using this tab. If no set up is selected, the system simply takes the List Price of the item(s) for that customer. (To view the List Price of a particular item, go to Items (Main Menu Bar) then select the item to open the Item Details screen. Click on Financial tab. You will see the List Price on the Pricing section.)
- On the Custom Pricing tab screen, you can:
- Select a Default Pricing Method on the drop down list.
- And/Or...Click the Add Custom Pricing Template drop down icon and select from the Custom Pricing Template list (set up by your company). Click on Go button. (Notice that the Custom Prices settings will be displayed on the Custom Prices table below it.)
- And/Or... Manually add Pricing Categories or Specific Items to further define the Custom Prices table.
- Note: The set prices on the Custom Prices table over-ride the selected 'Default Pricing' method.
Click Here to view the video on YouTube. (Or open YouTube and type: 1place-102.2 in the search bar.)
Below are the different ways to automatically price all items of a Customer based on the item cost:
- Option 1: How to Price ALL items to a Customer for the ITEM LIST PRICE
- Press F3 to look up a Customer record.
- Click on the Pricing tab then on the Default Pricing Method drop down list, select Item List Price. Click Save.
- Note: Make sure there are no other settings selected on the Pricing tab. If there are any, remove the record/s from the Custom Pricing table by clicking the X icon.
- Option 2: How to automatically Price ALL items sold to a Customer for X DISCOUNT OFF the ITEM LIST PRICE
- Press F3 to look up a Customer record.
- Click on the Pricing tab then on the Default Pricing Method drop down list, select Discount.
- Type in the Discount %. Click Save.
- Note: Make sure there are no other settings selected on the Pricing tab. If there are any, remove the record/s from the Custom Pricing table by clicking the X icon.
- Option 3: How to automatically Price ALL items sold to a Customer for X MULTIPLIER OF the ITEM LIST PRICE
- Press F3 to look up a Customer record.
- Click on the Pricing tab then on the Default Pricing Method drop down list, select Multiplier.
- Type in the Multiplier %. Click Save.
- Note: Make sure there are no other settings selected on the Pricing tab. If there are any, remove the record/s from the Custom Pricing table by clicking the X icon.
- Option 4: How to automatically Price ALL items sold to a Customer for X MARKUP ABOVE the Item COST
- Press F3 to look up a Customer record.
- Click on the Pricing tab then on the Default Pricing Method drop down list, select Markup.
- Type in the Markup %. Click Save.
- Note: Make sure there are no other settings selected on the Pricing tab. If there are any, remove the record/s from the Custom Pricing table by clicking the X icon.
- Option 5: How to automatically Price ALL items sold to a Customer for X ITEM PRICE LEVEL
- Press F3 to look up a Customer record.
- Click on the Pricing tab then on the Default Pricing Method drop down list, select Item Price Level.
- Select the applicable Pricing Level by clicking on the drop down list. Click Save.
- Note: Make sure there are no other settings selected on the Pricing tab. If there are any, remove the record/s from the Custom Pricing table by clicking the X icon.
Below are the different ways to automatically price a specific item sold to a Customer based on the item cost:
- Option 1: How to automatically Price a SPECIFIC Item sold to a Customer for X DISCOUNT OFF the ITEM LIST PRICE
- Press F3 to look up a Customer record.
- Click on the Pricing tab.
- On the Custom Pricing table, select the Specific Item by clicking the drop down list.
- Type in the Discount %. Click Save.
- Note: Custom prices that are set on the Custom Pricing table over-ride the Default Pricing Method assigned to that particular customer.
- Option 2: How to automatically Price a SPECIFIC Item sold to a Customer for X MULTIPLER OF the ITEM LIST PRICE
- Press F3 to look up a Customer record.
- Click on the Pricing tab.
- On the Custom Pricing table, select the Specific Item by clicking the drop down list.
- Type in the Multiplier %. Click Save.
- Note: Custom prices that are set on the Custom Pricing table over-ride the Default Pricing Method assigned to that particular customer.
- Option 3: How to automatically Price a SPECIFIC Item to a Customer for X MARKUP ABOVE the Item COST
- Press F3 to look up a Customer record.
- Click on the Pricing tab.
- On the Custom Pricing table, select the Specific Item by clicking the drop down list.
- Type in the value (%) on the Markup column. Click Save.
- Note: Custom prices that are set on the Custom Pricing table over-ride the Default Pricing Method assigned to that particular customer.
- Option 4: How to automatically Price a SPECIFIC Item to a Customer for X ITEM PRICE LEVEL
- Press F3 to look up a Customer record.
- Click on the Pricing tab.
- On the Custom Pricing table, select the Specific Item by clicking the drop down list.
- Select by clicking on the drop down list to choose the Price Level. Click Save.
- Note: Item Pricing Levels are defined and preset on Settings>Items>Item Settings>Item Pricing Levels (table).
- Note: Custom prices that are set on the Custom Pricing table over-ride the Default Pricing Method assigned to that particular customer.
- Option 5: How to automatically Price a SPECIFIC Item to a Customer for X Specific Price
- Press F3 to look up a Customer record.
- Click on the Pricing tab.
- On the Custom Pricing table, select the Specific Item by clicking the drop down list.
- Type in the value to set the price on the Specific Price column. Click Save.
- Note: Custom prices that are set on the Custom Pricing table over-ride the Default Pricing Method assigned to that particular customer.
Below are the different ways to automatically create Item Pricing Groups based on the type of part:
- Option 1: How to automatically Price 1 or more GROUPS of Items sold to a Customer for X DISCOUNT OFF the ITEM LIST PRICE
- Press F3 to look up a Customer record.
- Click on the Pricing tab.
- On the Custom Pricing table, select the Pricing Category by clicking the drop down list.
- Type in the Discount %. Click Save.
- Note: Custom prices that are set on the Custom Pricing table over-ride the Default Pricing Method assigned to that particular customer.
- Option 2: How to automatically Price 1 or more GROUPS of Items sold to a Customer for X MULTIPLIER OFF the ITEM LIST PRICE
- Press F3 to look up a Customer record.
- Click on the Pricing tab.
- On the Custom Pricing table, select the Pricing Category by clicking the drop down list.
- Type in the Multiplier %. Click Save.
- Note: Custom prices that are set on the Custom Pricing table over-ride the Default Pricing Method assigned to that particular customer.
- Option 3: How to automatically Price 1 or more GROUPS of Items sold to a Customer for X MARKUP ABOVE the Item COST
- Press F3 to look up a Customer record.
- Click on the Pricing tab.
- On the Custom Pricing table, select the Pricing Category by clicking the drop down list.
- Type in the Markup %. Click Save.
- Note: Custom prices that are set on the Custom Pricing table over-ride the Default Pricing Method assigned to that particular customer.
- Option 4: Item Pricing Option 9: How to automatically Price 1 or more GROUPS of Items sold to a Customer for X ITEM PRICE LEVEL
- Press F3 to look up a Customer record.
- Click on the Pricing tab.
- On the Custom Pricing table, select the Pricing Category by clicking the drop down list.
- Select by clicking on the drop down list to choose the Price Level. Click Save.
- Note: Item Pricing Levels are defined and preset on Settings>Items>Item Settings>Item Pricing Levels (table).
- Note: Custom prices that are set on the Custom Pricing table over-ride the Default Pricing Method assigned to that particular customer.
- On the Main Menu Bar, click on Sales > Pricing Templates.
- Click on the drop down under Search box to select the Template Name.
- Click on Update ALL Customers Using This Template button (below center).
- A popup screen will notify that this process will delete and update all Custom Pricing (related to the template selected) for all Customers that have the the selected Pricing Template. Click Ok to proceed.
- Select an Invoice.
- Click on the Create Credit Memo blue button at the bottom part of the page.
- A popup message will ask if you want to Return Entire Invoice. Click Yes.
- Note 1: All Line Items in that particular Invoice will be copied and carried over to the new Credit Memo created.
- Note 2: If you want to create a Credit Memo just for an item or few (and not for all of the items in the entire Invoice),
- Input the Qty Rtn (Quantity Return) value of the particular Line Item/s.
- Click on Commit Line Item button.
- Click on Create Credit Memo.
- A popup message will ask if you want to Return Selected Items. Click Yes.
- Note 3: You can put any value (equal to or less than the Qty Ship) on the Qty Rtn field.
- A new Credit Memo is created. Click Save.
- Go to the Credit Memo List screen.
- Press Shift+F8, or
- On the Main Menu Bar, click on Sales > Credit Memos
- Click on the New button on the bottom left.
- Enter the Bill To and Ship To Customer.
- On the right, select the Return to Warehouse.
- Input other details (Customer PO #, Payment Terms, Sales Rep, etc)
- On the Add/Edit Line Item table, select the Item # on the drop down arrow then input item(s) To Return and Returned.
- Click on Commit Line Item button.
- Click on Save.
- On the Sales Order screen, input the item number with back order.
- Click on Create PO(s) button on the bottom part of the screen. This will direct you to the Sales Order Purchase Orders (to create) screen.
- The default will show the current Sales Order with the back ordered item. You can click on Show All to look all the other back orders.
- Check the Sales Order you want to create a PO.
- Select Vendor on the drop down.
- Click on the Proceed (Show Prebuild Summary) button. A Sales Order PO's - Prebuild Summary popup will be displayed.
- You can either add the back ordered item on an existing PO by selecting the PO number under the Existing PO drop down arrow or create a new PO by checking the Create PO box.
- Click on Create/Add to PO's button.
- Look in the Purchase Order List screen to find the newly created PO.
- Click the button (in the top left) and select Item, or
- Press Shift+F10, or
- Click Item (on the left side) and then click on the New button on the bottom left.
- Input the Item details then click on Save.
- On the Item List screen, click on the Upload (arrow up) button on the top right of the screen. This will display the Import Wizard screen.
- On the Import Wizard screen:
- Click the drop down on the Import Type and select either Vendor Item Numbers (All Vendors) if trying to import items under 2 or more vendors, or Vendor Item Numbers (1 Vendor).
- You have the option to update item status and set to 'Active' by checking the box just below the Item Vendor.
- Click Download Excel Template (blue button) and fill in that excel file with the Item records information. Save this file on your PC.
- Go back to the Import Wizard screen, click on the Browse button and select the previously saved file from your PC.
- Click Proceed (bottom right). A pop-up message will be displayed when import has completed.
- ***If you already have an existing Item data file, you may choose to upload that file and manually map the database columns with the excel columns by clicking on the drop down arrow (under the Excel Columns).
- Check Stock Details for an item:
- On the Find Parts Line Item List section, click on the item then click the Show Stock button (footer, center). This will display the 'Item Stock' details (i.e. Item#, Qty in Stock, Vendor, Reserved for Order #, Warehouse, Bin, Location, Cost) for that item just below the Line Item List section.
- Note: This is the same information you would see (plus more details) if you go to Item Detail screen>Stock tab for that particular item.
- Click on Hide Stock button to close and return to the full list of items.
- Instantly view Customer Credits on the Find Parts Screen:
- On the Find Parts screen, click on Show Customer Credits button (footer, center).
- A popup screen will show you a summary of the Invoice#/Credit Memo# and the corresponding credit amounts.
- Check Vendor Details for an item:
- On the Find Parts Line Item List section, click on the magnifying glass icon beside the particular Item#. Item Detail screen will be displayed.
- Click on Vendors tab.
- Include Inactive Items in Search Results: By default, when new items are imported into 1place (using the Manage Catalog screen) the items are set to 'Inactive' (meaning they will NOT appear in your Find Parts screen searches--until such time that a Supplier is added to the item. (This helps prevent selling items for which you have no Supplier). When viewing a list of parts on the Find Parts screen, you can click the Include Inactive & PL button to add any inactive parts to the list in light gray (if the part matches your search criteria).
You have 3 options to choose from to create Purchase Orders for special order items (these are out of stock items or for some reasons, currently unavailable). On the Sales Order screen, these are the Line Item(s) with:
1--The PO field box(es) checked, and
2--Do NOT yet have PO#(s) in the PO # field.
- NOTE: You can configure the Setting that will automatically check the PO field box each time items 'that are out of stock' are placed on a Sales Order . To do this, go to Settings>Sales>Sales Orders then select 'Yes' from the drop down button under Sales Settings section that says 'After adding an item to a Sales Order, auto select the Sales Order line item PO checkbox when the item is out of stock'.
- OPTION 1 - Make a PO from a Sales Order. (When there are one or more Line Items to be purchased from the same Vendor.)
- On the Sales Order screen, click the Create PO(s) button. This will open the Sales Order Purchase Orders (to create) screen.
- On the Sales Order Purchase Orders (to create) screen, click on the Vendor drop down button and select a Vendor. (Note: If you have more than one (1) Line Items, make sure they have the same Vendor)
- Input Cost for each Line Item.
- Click on Proceed (Show Prebuild Summary).
- Click on Create/Add to PO's button.
- The Purchase Order screen will automatically be displayed.
- Notice the SO# on the Sales Order # Column (under the Add/Edit Line Item section) for that Line item. When you click on the magnifying glass icon beside it, it will direct you back to the Sales Order screen (where you made the PO for that line item).
- (Conversely) On the Sales Order screen, notice that the PO column has been checked and the PO# field for the Line Item has already been filled. When you click on the magnifying glass icon beside it, it will direct you to that related Purchase Order you just created.
- OPTION 2 - Make a Batch of PO's to buy Special Order Items. (When there are more than one (1) Line Items and they are to be purchased from different Vendors.)
- The process is similar to Option 1 except that you will have more than one Vendor for these batch of Line Items.
- Another way is to directly go to the Sales Order Purchase Orders (to create) screen and click on the Show All circle icon (top left). This will show you ALL special order items that need to be purchased.
- You can create a batch of Purchase Orders on this screen (instructions as follows).
- Select the items that you want to include in this batch of PO by checking the boxes (left, first column).
- Select the Vendor for each item and input Cost.
- Click on Proceed (Show Prebuild Summary).
- Click on Create/Add to PO's button. You have just created a batch of POs. You can see them now added in your Purchase Order list [(Main Menu Bar)Purchasing > Purchase Orders].
- OPTION 3 - Add Special Order items to an Existing PO.
- Scenario: Suppose you created PO 101 to Vendor A with a few line items. Then your phone rang and another item is placed on a Sales Order (that has the PO field box checked) and you want to add that item to the existing PO 101 (instead of creating a New PO) because you plan to order from the same Vendor A. The following instructions will allow you to do this.
- On the Sales Order screen (where the PO field box of the Item that you want to add is checked), click Create PO(s). This will open the Sales Order Purchase Orders (to create) screen.
- On the Sales Order Purchase Orders (to create) screen, click on the Vendor drop down button and make sure to select the same Vendor as the Vendor on the Existing PO (where you want to add the item(s). **In this sample scenario, Vendor A.
- Input the Vendor Cost.
- Click on Proceed (Show Prebuild Summary).
- On the Sales Order PO's - Prebuild Summary popup screen, uncheck the Create PO box then click on the Existing PO drop down icon. The popup list of PO's with corresponding Vendors will appear. Select the PO# where you want to add the item(s).
- Note: The popup list of POs is arranged by date from most recent down to oldest POs with corresponding Vendor names making it easy for you to locate the right PO.
- Click Create/Add to PO's button.
- The Purchase Order screen will automatically be displayed and will show (on the Add/Edit Line Item section) that you have just added the new Line Item.
- Option 1 - Find the Invoice and Return the Item (to make a related Credit Memo).
- Ways to find the Invoice:
- Press F7, or
- Press F3 to look up the Customer. On the Customer Details screen, click on the Sales History tab then click on the Invoices/CM's button. Click on the particular Invoice on the table as displayed.
- On the Invoice screen under the Add/Edit Line Item section, enter the quantity you want to return on the Qty Return column of the item(s).
- Note: Qty Rtn cannot be greater than the Qty Ship.
- Click on Commit Line Item button (down, right of the table).
- Click on Create Credit Memo button (bottom, center).
- 'Return Entire Invoice?' popup message will show up.
- Click Yes ONLY if returning ALL items on that Invoice.
- If you click No (meaning you only plan to return one or few items on that Invoice), a popup screen will appear and ask if you plan to 'Return Selected Items?'. Click Yes.
- You have just created a new Credit Memo.
- On the Credit Memo screen, Click Save red button (bottom right).
- NOTE: When you return an item using this method, 1place enters the original price paid as the amount to refund on each Credit Memo line item created. 1place also makes sure that users do not over-return items - meaning, it will not allow more items to be returned than what were originally invoiced.
- Option 2 - Create a Credit Memo for the item (without linking it to an Invoice).
- Ways to create a new Credit Memo:
- Press Ctrl + F8, or
- On the Main Menu Bar, click on Sales > Credit Memos then click on New button (bottom left of the screen).
- Enter the Bill To and Ship To Customer.
- On the right, select the Return to Warehouse.
- Input other related information such as Customer PO #, Payment Terms, Sales Rep, Order Source etc.
- On the Add/Edit Line Item table, input the Item# by selecting from the drop down arrow. Input the number of items to return on the 'To Return' field. Input number of items Returned. Click on Commit Line Item button.
- Click on Save.
- Option 3 - Delete the Invoice, Modify the Sales Order, and then Recreate the Invoice.
- NOTE: This option assumes that,
- You have enabled the setting to have your Invoices automatically inherit the Sales Order # from which it was created. To do this, click on the Gear icon (top right of the screen) then select Settings > System > Record Numbering. Check the box that says 'Use Sales Order # When Creating Invoice' under Invoices section.
- You have created the Invoice but have not actually delivered the Invoice to the Customer yet.
- Open the Invoice screen.
- Press the Delete button (bottom left) to delete the Invoice.
- A popup message will ask you if you want to 'Delete Related Sales Order?'. Click No.
- The Sales Order screen (of the Sales Order related to the deleted Invoice) will automatically be displayed.
- At this point, you can delete the item or change the Qty Ship and Qty Ord on the Item.
- Click the Create Invoice button (bottom center) to re-create the Invoice.
- Open the Add New Product or Service Item screen in different ways:
- Press Ctrl + F10, or
- On the Quick Access Keys (top left), click the + icon and select Item, or
- Click the New button on the lower left part of the Item List screen, or
- Click the New Item button on the lower left part of the Item Details screen, or
- On any of the Quotation, Sales Order, Invoice, Credit Memo or Purchase Order screens under the Add/Edit Line Item table: When typing in an Item Number that is not found in the Drop down list, click + Add New (lowest part of the drop down list) to add a new Item record.
- On the Add New Product or Service Item screen, fill in the following needed information:
- Item Number, Description, Type, Search Category, Search Sub Category, Year, Make, Model etc.
- Click Save.
- NOTE: When you add a new part (following the instructions above) the Year, Make, Model, Category, and Subcategory are all used to automatically create a record in your Find Parts Catalog. (This enables you to find parts using the Find Parts (F1) screen by Year, Make, Model, etc) To modify the search criteria (or add additional vehicles that the part fits), see the instructions in the section below.
- On the Item Detail screen of the particular Part you want to modify, click on Item Details tab.
- In the section called Categories & Part Numbers you can see the details of the particular item/part (Type, Search Category, Years Range, Make, Model, etc.) NOTE: These details are used by the Find Parts screen to find parts.
- Changing the Years Range will auto update the Years Listing field (below it) which is the actual field the Find Parts screen uses to search for the Year of the part.
There are 3 ways to import and update items in your item list AND searchable Catalog:
- Option 1 - Import and update Items (automatically) using the 1place Manage Catalog screen.
- Go to Item Detail screen > Catalog (tab) > Manage Catalog button (middle left).
- From the Catalog Management screen, click on Add New Items From Catalog Items button (bottom right).
- Click on Display New Items To Add ( red button at the bottom left). This will generate a temporary file or list of items that meet the Manage Catalog and Year/Make/Model filter criteria but are not yet on OneSource.
- Check the items to be added then click on Add All Selected Items to 'Item' List in OneSource (green button, bottom left).
- Upon successful import, you may check the added items already included in your Item List.
- Option 2 - Import and update Supplier Item #'s and Costs using the Import/Export function in 1place.
- On the Item List screen, click on the Upload (arrow up) button on the top right of the screen. This will display the Import Wizard screen.
- On the Import Wizard screen:
- Click the drop down on the Import Type and select either 'Vendor Item Numbers (All Vendors)' if trying to import items under 2 or more vendors, or 'Vendor Item Numbers (1 Vendor)'.
- You have the option to update item status and set to 'Active' by checking the box just below the Item Vendor.
- Click Download Excel Template (blue button) and fill in that excel file with the Item records information. Save this file on your PC.
- Go back to the Import Wizard screen, click on the Browse button and select the previously saved file from your PC.
- Click Proceed (bottom right). A pop-up message will be displayed when import has completed.
- ***If you already have an existing Item data file, you may choose to upload that file and manually map the database columns with the excel columns by clicking on the drop down arrow (under the Excel Columns).
- Option 3 - Ask OneSource Software customer support to import your data for you.
- Get connected to any OneSource Customer Support agent.
- SEND AN EMAIL: Send your query to support@onesourcesoftware.com to get answer to your concern(s).
- VOICE CALL: Talk to a live tech support agent at 1 (801) 748-4804
Reference: All Keyboard Short-Cuts
Keywords: training sales reps auto body parts
|
| |
|
|

