|
|
| |
| |
(004) 1place Accounting (AR, AP, Banking, GL) - Quick Start Guide (*** UNDER CONSTRUCTION ***)
| Author: Steve Childs Reference Number: AA-02804 Created: 2021-07-21 16:44 Last Updated: 2022-06-23 19:01 |
0 Rating/ Voters
|
 |
(This KBA is still under construction...)
Viewing Training Videos (on YouTube)
NOTE: If cannot click on the links (because you have printed out this article) please visit www.youtube.com in the search bar type: 1place . cloud (be sure to put in the spaces).
|
Video # |
Category |
Topic |
Length |
YouTube Keyword |
|
001.0 |
Overview & Setup |
Quick Start: Learn 50% of 1place in less than 10 min |
6 min, 58 sec |
1place-001.0 |
|
001.1 |
Overview & Setup |
Quick Start: Using the Find Parts screen. How to find, price and sell parts. (For Auto Body Supply) |
11 min, 07 sec |
1place-001.1 |
|
001.1b |
Overview & Setup |
Quick Start: Using the Find Parts screen. How to find, price, and sell parts. (For Wholesale Distribution) |
|
|
|
001.2 |
Overview & Setup |
Quick Start: How to Print & Customize Invoices, Picking Tickets, etc. |
7 min, 25 sec |
1place-001.2 |
| | | | |
|
101.1 |
Sales |
How to create Customers. |
6 min, 06 sec |
1place-101.1 |
|
101.2 |
Sales |
How to create Items (Parts). |
14 min, 58 sec |
1place-101.2 |
|
101.3 |
Sales |
How to create Quotes. |
2 min, 39 sec |
1place-101.3 |
|
101.4 |
Sales |
How to create Sales Orders. |
3 min, 30 sec |
1place-101.4 |
|
101.5 |
Sales |
How to create Invoices. |
8 min, 40 sec |
1place-101.5 |
|
101.5a |
Sales |
How to receive a payment on an Invoice (in 1place) |
|
|
|
|
|
How to apply a Credit (payment) to an Invoice |
|
|
|
101.6 |
Sales |
How to create Credit Memo’s (or Return Authorizations). |
7 min, 50 sec |
1place-101.6 |
|
|
|
|
|
|
|
102.3 |
Sales - Pricing Items |
How to set up sales taxes codes in OneSource. |
|
|
|
104.1 |
Purchasing Items |
How to create PO’s - Overview |
16 min, 01 sec |
1place-104.1 |
|
104.2 |
Purchasing Items |
How to create PO’s for Special Orders |
|
|
|
|
|
|
|
|
|
|
AR, AP, Banking |
How to Receive 1 payment on 1 invoice (in 1place) |
|
|
|
|
AR, AP, Banking |
How to Receive 1 payment on multiple Invoices (in QuickBooks Online) |
|
|
|
|
AR, AP, Banking |
How to make a Deposit (in QuickBooks Online) |
|
|
|
|
AR, AP, Banking |
How to Enter an AP Bill (in QuickBooks Online) |
|
|
|
|
AR, AP, Banking |
How to Pay an AP Bill (in QuickBooks Online) |
|
|
|
|
AR, AP, Banking |
How to Reconcile a Checking Account (in QuickBooks Online) |
|
|
|
|
|
|
|
|
|
107.1 |
QuickBooks Online Integration |
Overview of QuickBooks Online Integration with 1place |
7 min, 08 sec |
1place-107.1 |
|
107.2 |
QuickBooks Online Integration |
Preparing QuickBooks Online For Use With 1place |
22 min, 41 sec |
1place-107.2 |
|
107.3 |
QuickBooks Online Integration |
Getting Started with the proper QuickBooks Online Balance Sheet |
|
|
|
|
|
Connecting QuickBooks Online Bank Accounts to your Bank |
|
|
|
|
|
|
|
|
|
|
xxxxxxxxxxxxxxxxxxxxxxxxxxxxxxxxxxxxxxxxx |
xxxxxxxxxxxxx |
|
High Level Basics
Logging into 1place:
- Open up your Google Chrome browser and navigate to: osqbo.com. Enter your email and password. Click Sign In.
Getting HELP with 1place:
- Click on the HELP
 button on ANY screen, or button on ANY screen, or - Visit www.1place.cloud/help, or
- Talk to your company's 1place admin. (Your onsite 1place guru)
Quick Start Buttons
MOST of your tasks can be completed using the 4 GREEN Quick Start buttons (upper part of the Main Menu bar).

The MAIN Menu Bar (on the LEFT side)
The MAIN Menu bar on the left side of the screen provides a way to open virtually all of the screen you will use to perform your job. 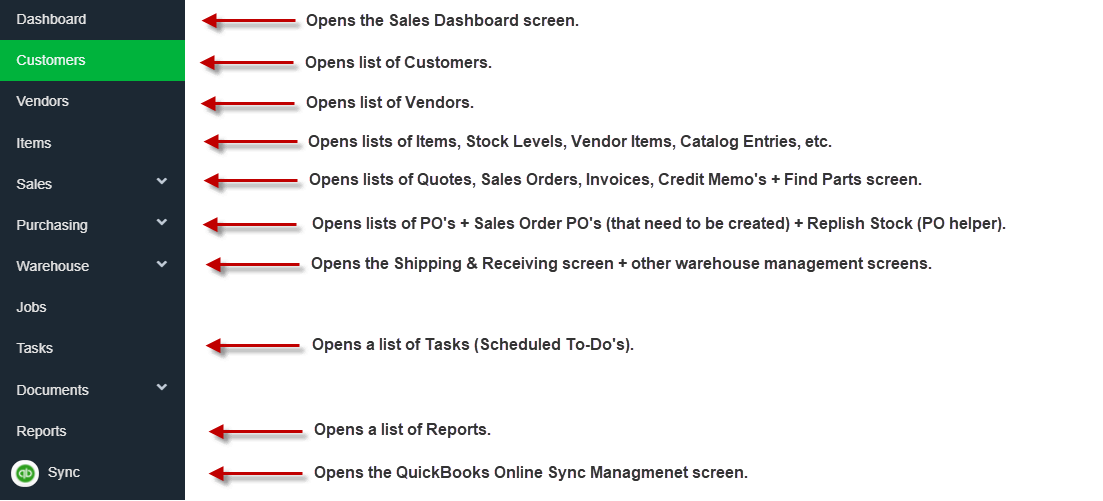
How to ADD Records (Customers, Quotes, Sales Orders, Items, Etc...)
- Click the ADD
 button (the PLUS sign on the top left corner) and select the type of record you want to add, or button (the PLUS sign on the top left corner) and select the type of record you want to add, or
- Click on the +ADD NEW
 at the bottom of a drop down list (when you cannot find the value in the drop down list), or at the bottom of a drop down list (when you cannot find the value in the drop down list), or
- Click the NEW
 button on any screen (to add a record of similar type), or button on any screen (to add a record of similar type), or - Press a keyboard shortcut, such as Ctrl+F3, or Ctrl+F4, etc. (You cam see a list of keyboard shortcuts ON THE RIGHT SIDE of the drop down list when you click the button).
How to SAVE Records
- Whenever the SAVE
 button turns RED that means there is unsaved data. In most cases this button gets pressed automatically for you. button turns RED that means there is unsaved data. In most cases this button gets pressed automatically for you.
How to FIND Records
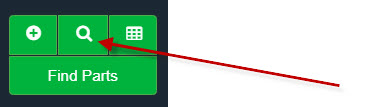
- OPTION 1 - Quick Start Magnifying Glass Button: Click the FIND
 button (in the top left corner) and select the type of record you want to find. button (in the top left corner) and select the type of record you want to find.
- OPTION 2 - Function Keys. You can press any of the FUNCTION keys on your keyboard (as show in blue below).
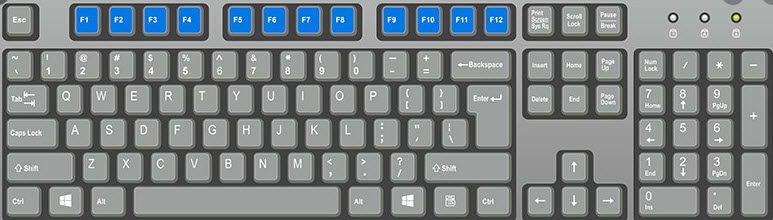
Press F1 to find a List of Parts (by Year, Make, Model, item #, OEM#, Partslink #, etc)
Press F2 to find a Job record.
Press F3 to find a Customer.
Press F4 to find a Vendor.
Press F5 to find a Quote.
Press F6 to find a Sales Order.
Press F7 to find an Invoice.
Press F8 to find a Credit Memo.
Press F9 to find a Purchase Order (PO).
Press F10 to find an Item (Part) by the Item / Part #.
- NOTE: When you click the button you can see the list above in the drop down list (on the right side).
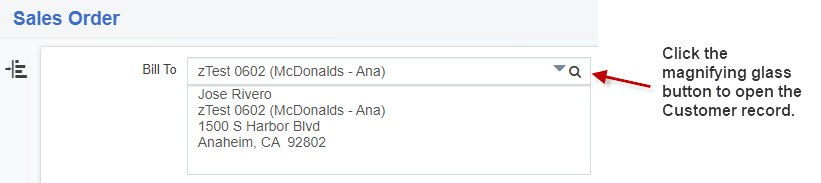
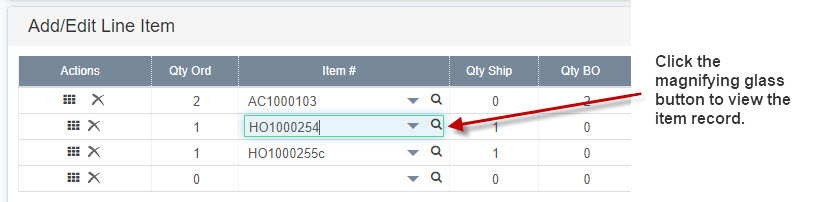
- OPTION 3 - Magnifying Glass button. You can click on the
 button next to any record (to open the record detail screen). button next to any record (to open the record detail screen).
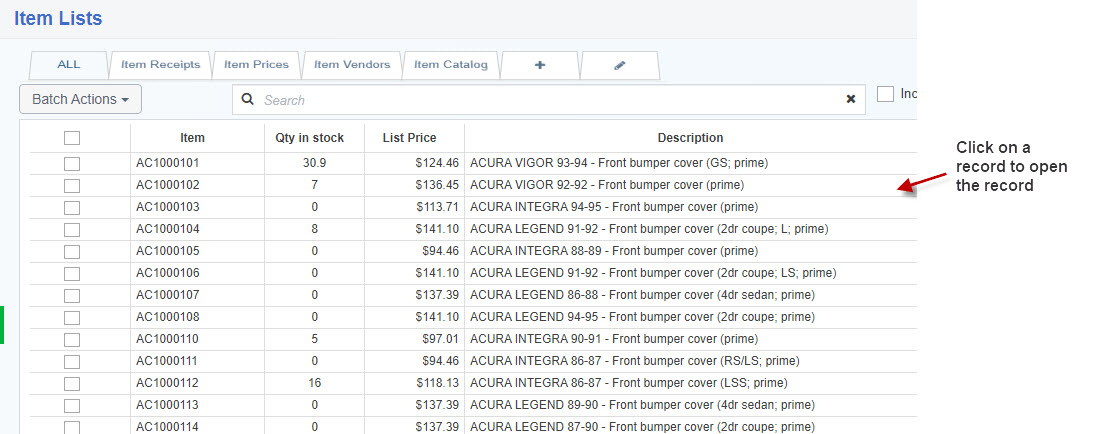
- OPTION 4 - Click a record on a List screen.
Using 1place with QuickBooks Online
Why QuickBooks Online?
The predecessor to 1place is OneSource (for MS Access). OneSource has built in AR, AP, Banking, and GL features. So why doesn't 1place have the same features? If you go back to 2000-2001, (when OneSource was first being created), the goal all along was to integrate OneSource with QuickBooks for AR, AP, Banking, GL and Payroll functionality. However, with no API to speak of back then, (after many months of trying various work arounds), it became clear that OneSource could not feasibly integrate with QuickBooks back then, so we purchased and created code to perform these basic functions--but it was never it's strong suite. Now fast forward to 2016 when the new re-write of OneSource (1place) was first being designed we went back and looked into integrating with QuickBooks again and found that the Online version of QuickBooks had a near complete API. This being the case we made a decision in 2016 to integrate 1place with QuickBooks Online because it is and will probably always be light years better when it came to Online Banking, Financial Reports, and Payroll. It is also very good at AR (especially AR Collections) and AP.
Case in point: QuickBooks Online integrates with nearly every bank in the US, can calculate Payroll for every state in the US, and can help calculate and produce Sales Tax Reports with every state in the US.
We like using QuickBooks Online for the 4-5 things it is best at, and believe your Accounting firm will like it as well.
How to Setup, Sync, and User QuickBooks Online With 1place
Please refer to 1place KBA: How the 1place QuickBooks Online - How to Setup, Sync, and Use with 1place.
The 1place KBA listed above gives specific details about the following topics:
- Big Picture - How it Works
- How 1place Works with QuickBooks Online (Overview of Which Tasks to do Where)
- Summary of What TO DO in QuickBooks Online
- What Does NOT Sync with QuickBooks Online
- Which Version of QuickBooks Online is Best for 1place?
- Preparing QuickBooks Online for Syncing with 1place
- Adding User Accounts
- Setting Up Your Chart of Accounts
- Setting Up Payments Terms, Payment Methods, Locations, etc
- Setting Up Bank Account Syncing (to download checks, deposits, and adjustments from your bank)
- Importing Customers (a reminder to allow 1place to handle this...)
- How to Get QuickBooks Online Started Out With the Proper GL Account Balances
- How to Connect 1place with QuickBooks Online (when to do this -- and when NOT to do it)
- How to Show or Hide the QuickBooks Online Sync Center (in 1place)
- How to setup Syncing Properties
Online Banking
How to Download Online Banking Transactions
- NOTE: Please see How to setup online Bank Account syncing instructions above
- Click Banking (on left side) > Update (on top right side)
- NOTE: There is a bold heading called Bank and Credit Cards. To the right of that there is a drop down list that allows you to CHANGE the account from for which you will download transactions.
Adding or Editing 'Rules' (to help auto select the proper GL Account for online banking transactions)
- Click Banking.
- You will notice a few sub-tabs on the top left portion of the screen. The 2nd tab (as of this writing) is labeled Bank Rules.
- Click New Rule (in top right corner) to add a new rule or Edit next to any existing rule that you want to edit.
Common AR / Accounts Receivable Tasks
How to Make an Invoice (from a Sales Order)
How to search for an Invoice by Invoice #
How to see all Invoices for a Customer
How to see all Payments for a Customer
How to receive a Payment on 1 invoice
How to receive a Payment on several Invoices (in QuickBooks Online)
How to receive a Deposit on a Sales Order
How to Create a Credit Memo from an existing Invoice.
- Select an invoice.
- Click on the Create Credit Memo blue button at the bottom part of the page.
- A popup will show up and ask if you want to return the entire invoice. Click Yes.
- Then the credit memo is created and can be found on the Credit Memo section.
How to Create a Credit Memo from scratch.
- Press Shift+F8 or go to the left pane, click on Sales Order then Credit Memo
- Click on the New button on the bottom left.
- Enter the Bill To and Ship to Customer.
- On the right, select the Return to Warehouse.
- Input the items to return on the Add/Edit Line Item table, click on the Commit Line Item button.
- Click on Save.
How to send a Statement to 1 Customer (in QuickBooks Online)
How to send a batch of Statements (in QuickBooks Online)
How to Make a Deposit (in QuickBooks Online)
Paying Invoices with Partial Payment + Credit Memo's
- Click "+" > Receive Payments.
- Enter all usual info, including the Amount Received.
- Click the box next to each Invoice you want to pay (or, if paying all Invoices on file, check the box above all of the boxes).
- Then scroll down to see the existing Credit Memo's and enter the amount you want to apply (in the Pay field).
- The 'Amount to Apply' on the bottom show be the total of the Amount Received and the Amount to Credit.
- Click the Save button.
- NOTE: Payments received on Invoices in QuickBooks Online (which were previously created and synced from 1place) will be synced back into 1place using the Sync feature in 1place.
Finding and Deleting Payments on Invoices
- Find the Invoice:
- Click the Magnifying glass
- Type in the invoice #, then click on the Invoice in the list.
- Open and Delete Payment:
- Once the invoice is open, on the right side of the screen you will see a BLUE link that shows the # of payments made on the invoice. (For example it might read: 3 payments made ($6,061.05))
- Click on the blue payments link. This will show a little table of the payments made.
- Click on one of the payments and then when the payment appears click More > Delete.
- Repeat the steps for each payment you want to delete.
Common AP / Accounts Payable Tasks
How to Create a PO
How to Receive a PO
How to Find a PO
How to Make an AP Bill (in QuickBooks Online) from a PO in 1place
How to Pay Bills (in QuickBooks Online)
How to Pay a Bill with a Check
How to Pay a Bill by Wiring Funds (rather than printing a check)
- Open the Bill you want to pay with a bank account Wire. (This assumes you will call your bank and arrange for the wire outside of Quickbooks)
- Click the Make Payment button.
- Pay the bill as you always would but enter WT (for wire transfer) in the Ref No field.
How to Pay a Bill with a Credit Card or Online Transfer
- Select the Plus icon (+) on the Toolbar.
- Under Vendors select Pay Bills.
- In Payment account, select your credit card account.
- Enter the Payment date.
- Select the bill you want to pay.
- Select Save, Save and print or Save and close.
How to Pay a Bill with a Bank Transfer
Method #1
- Click + > Pay Bills
- Click on the Bill you want to pay.
- Click Make a Payment.
- Select the Bank/Credit account from which you want to pay the bill.
- Accept the Ref No. or change it to a Reference # of your own choice.
- Select the Bill(s) you want to pay.
- Click Save & New (or Save & Close).
- (NOTE: You can pay another bill for the same vendor by typing in the Vendor name and then clicking on the Bill (card) you want to pay on the right side. Then repeat a few of the steps above as necessary).
Method #2
- Click Expenses (on Left)
- Vendors (on top)
- Scroll down and find the Vendor (or type the Vendor Name in the search box) > then select the Vendor.
- Click on the Bill you want to pay.
- Click Make a Payment.
- Select the Bank/Credit account from which you want to pay the bill.
- Accept the Ref No. or change it to a Reference # of your own choice.
- Select the Bill(s) you want to pay.
- Click Save & New (or Save & Close).
- (NOTE: You can pay another bill for the same vendor by typing in the Vendor name and then clicking on the Bill (card) you want to pay on the right side. Then repeat a few of the steps above as necessary)
Making Adjustments to Inventory Levels
Assuming
- SPECIAL NOTE: If you are using QuickBooks Online with 1place DO NOT make any adjustments to inventory quantities in stock in QuickBooks Online. Instead, follow these steps to adjust the inventory level in 1place:
- Open 1place.
- Press F10 to search for the part you want to adjust.
- Click on the Stock tab.
- Click on the Adjust Quantities in Stock button.
How to Setup and Paying Sales Taxes (in Multiple States)
How to delete a Sales Tax Return Payment (before sending it)
- Taxes > (When you see 'Your returns are still in the works' WAIT for it it finish.
- (Top right corner) > History
- Click on the Return (View Return button) > Click on the Date > Delete (button in bottom right corner).
Common Banking & General Accounting Tasks (in QuickBooks Online)
How to Manage your Chart of Accounts (In QuickBooks Online)
How to Create Journal Entries (in QuickBooks Online)
How to Open the Check Register
- Click Banking (on left) > Use Register (on right)
How to Create a Check
How to Create an Expense (to record an expense)
How to Void a Check
- Open the Check Register
- Locate the check you want to Void (or click "+" > Check to create the check you want to void)
- On the check click More > Void
Getting Additional Help for QuickBooks Online
Contact QB for Help
- 1-800-488-7330 (6am-6pm Pacific Time, weekdays, plus shorter hours on Saturday)
- You will need your Company ID. You can locate that by clicking: Gear (icon) > Account and Settings > Billing & Subscription. Then note the Company ID in the top left corner.
Links Provided by Intuit (the Makers of QuickBooks Online)
|
| |
|
|

