Initial Setup
Before the system can be used, ensure you have set the appropriate settings in 1place based on the section above title "Required settings and company preferences".
Once you receive your initial account, the first thing you should do is setup your settings and users, refer to the two sections below to do that.
After users and setting are set, you will need to make sure all of your inventory is in bins/locations in your 1place data. If it is not already like that, it may be best to do a full inventory count using the Count By Bin screen. You can find details on that several sections down in a section titled "How to use the Count Items by Bin Screen"
Adding/Editing User Accounts
Settings -> User Settings
You will see a drop down for selecting a user. Select the user you want to edit and click "Edit User" or click "Add New User" to add a new one.
User Profile
Admin: Grants full access to restricted screens. Allows this account to authorize credits
Block Entry of Items Not on PO: If checked, will prevent this particular user account from scanning items that are no on the PO being scanned
Default Warehouse: Default warehouse that will be used whenever warehouse specific functions are being performed
OneSource User: This user's user account in OneSource. All user accounts must have one for proper tracking.
Access: This is a full list of all the screens in the system. The user will have access to them if they are checked.
Company Settings
This screen contains company wide settings for the system.
It is located at Settings -> Company Settings
Time Zone: Set to timezone for you company to keep times in sync on various pages and procedures.
Scan Items into Bin Locations: Determines if you are required to scan a location when receiving a PO. This should
Bin Scanning Sets Item Location Field: Determines if bin counts and bin transfers will adjust the items "default" location field (in addition to its bin)
Inventory Count Sets Item Type to Inventory: Determines if counting an item automatically changes that items type to "Inventory"
User Serial: Determines if you will be prompted to enter serial number when scanning items on various screens
Number of Dashes in Location: Number of dashes the system will expect to see when scanning a bin/location. If the scan has a different amount you will receive a warning.
Item Number Used for Custom Credits: Item number used in your system for requesting custom credits. An item should specifically be setup to handle this to keep things organized.
Default Reason for Custom Credits: Credit requests need a stated reason, this is the default for custom credits.
Prevent Manual Changing of Quantity: Determines if the system will block you from changing quantity manually on various fields via the keyboard.
Allow Damaged Item Inspections: Determines if an item can go through the inspection process and be marked "damaged"
Put Away Returns Default Date Range in Days: Default date range that will be used on the Put Away Returns screen
Picking Default Date Range in Days: Default date range used for picking
Notification Emails: Emails to receive notice.
Remove Remaining Items with No Bin After Count: If checked, after counting a bin any item scanned will have all remaining inventory that is NOT IN A BIN removed. IE if you have 5 of item X with no bin/location and you do a bin count and put 3 in the bin, the remaining 2 will be entirely removed from your inventory
Setting Picking Order
Settings -> Set Picking Order
Picking order determines the order items are listed on the picking screen. You can set the order via two different methods, either user specific, or a generic order by bin. User specific is generally far more useful
Set Pick Order By User
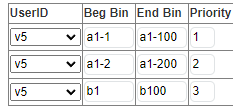
You will select a user, and then setting a beginning bin and ending bin "range" and assigning a priority. This will set the priority for that entire bin range.
The range does its best to detect every thing intelligently based on the dashes. If you enter "a1-1" for the beginning and "a1-100" for the end, then bin "a1-25" and "a1-11" will be included, but bin "a1-101" and "a2-100" will not be.
Look at the below example:
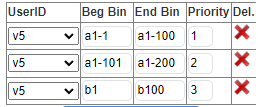
In this example setup, when user "v5" starts picking, all the items on their list will arrange themselves based on the bin they are in to best match the priority setup. Items in bin "b25" will show up after items in bin "a1-105". Any items not matching any bins will be at the bottom.
Click Add Row to start get started.
Set Pick Order By Bin
This ordering method is much stricter and less flexible. You must directly list all bins you want to set a priority for as opposed to a range.
- Enter a bin
- Enter the priority
- Click Submit
Manage Bins
On this screen you can enter a full list of bins and restrict scanning to ONLY those bins for the entire system.
This will be active if you list even one bin, so either list every bin you have or do not use this function.
You can manually add bins by typing them in and hitting enter.
Alternatively you can upload a list directly by clicking "Upload List". This list should just be an excel file with each row being a bin, nothing else.
Upload List
- Click Upload List
- Click Choose File and browse to the excel file that is just a list of your bins
- Click Upload Bins
How to use the Receive PO (On Dock) screen
- Open and login at https://osscan.osonlineorders.com/
- Choose Purchase Order
- Choose Receive PO to Dock
- Enter or scan PO# into PO# field
- Click Locate PO
- When PO supplier data appears click Scan Now
- Scan item numbers
- Click Done
- Reconcile data
- Click Done
How to use the Receive PO to Bins screen
This feature works where the user has items to be recieved on a PO and will put the items directly on the shelf before receiving them into stock.
This feature SHOULD NOT be used if the PO has already been received. For that functionality see the "How to use the Bin Transfer screen" section below
- Open and login at https://osscan.osonlineorders.com/
- Choose Purchase Order
- Choose Receive PO to Bins
- Enter or scan PO# into PO# field
- Click Locate PO
- When PO supplier data appears click Scan Now
- Scan the bin where the item will be located for future pulling
- Scan the item number
- Repeat steps 7-8 until finished
- Click Done
- Reconcile data
- Click Done
How to use the picking system
The picking system on 1placeWMS is tightly tied to the Warehouse > Shipping & Receiving section of 1place.
Before continuing, make sure to setup your status flow for picking in 1place in Settings > Warehouse > Shipping/Receiving.
Your orders must be able to have the status of "To Print & Pick" and the "Next Status" entry must be "Picking"
When an order shows up in the Warehouse > Shipping & Receiving > To Print & Pick section, it is ready to be picked on 1placeWMS
Once picking starts, it will transition to the "Picking" status.
When a user goes to pick, they will be able to select form a variety of options:
- All Orders: Will give user full item list that they need to pick based on what is assigned
- By Route: Lists routes that need something picked and the user can select which ones they want to pick
- Customer Pickup: Lists orders that are marked as Customer Pickup. User can select which ones to pick
- Single Order: Lists all orders pending picking. User selects one to pick
- Multiple Orders: Lists all orders pending picking. User can select multiple to pick.
- Currently Picking: Resumes picking items that the user had previously started but paused.
After selecting which picking method above the user will come to the main picking screen. This lists all the items that need picking, the bin to pick them from, and the quantity.
- Click Start Picking (note: this will not be available or needed if you resumed picking from earlier)
- Scan the bin you are picking the item from
- Scan the item you are picking
- The line for this item will turn green once all of it has been scanned
- You may be prompted to clarify which item it was if multiple are coming form the same bin for separate orders
- Repeat steps 2 and 3 until done
- Click Done
Any orders fully scanned should now progress to the status of "To Dispatch".
How to use the Scan Orders for Delivery screen
- NOTE: It is recommended that you have any linked PO's received so that dispatching can properly ship items after performing this scan
- NOTE: The drivers list is based on your 1place users that are marked as a Driver. You can view/change that in 1place by going to settings and then users
- NOTE: For orders to be scanned on this screen they must be in the "To Dispatch" status
- Open and login at https://osscan.osonlineorders.com/
- Click Sales Orders > Ship Order > Scan for Delivery, Click Next
- Click the desired driver (this list is based on your users marked "driver" in 1place)
- Select what day the order is for to automatically create a Dispatch #, or manually set one in the Dispatch # field, Click Next
- There are two ways to proceed from here, you can scan each ticket you want to include, or select a route
- Scan each ticket included in this shipment in delivery order
- Click "Use scan order" to route based on how you scanned them or "Use Suggested Order" to have google maps use the most efficient route.
- Select the routes you want to ship.
- click Submit to have it routed via google maps
- Scan items in the order shown as they are loaded for delivery, Click Finish
- Open the Warehouse > Shipping & Receiving > To Dispatch
- Click Print Manifest
- Choose the driver from the drop down
- Choose the dispatch/manifest number. (If the number was auto created it will be in this format: YY.MMDD_Driver_run number (example 18.0626_donny_1)
- Choose your manifest printing option and click print
How to perform returns
There are 4 steps to the return process. This section is meant to be a brief high level overview of the entire return system. See the sections further down for more details on each individual screen.
You must have a status of
- Request a credit on the Request Credit screen.
- Here you will enter an invoice you wish to start the return for and select the items to return
- You can only request a credit for an invoice that has eligible items for return.
- Item eligibility is based on the number of days it has been since the order and your settings for NumberDays in 1place under settings-> sales - > invoice/credit memos->credit memo reasons
- Authorize the credit on the Credit Authorization screen
- An administrator with proper permissions will review the credit request and approve or deny it
- Upon receiving the item back to your warehouse it will be inspected on the Inspect Returns screen
- NOTE: the credit memo must be put in the "RA To Inspect" status to proceed
- Here you will scan the item and tell the system if it is good for returning to stock or not
- After inspection, put the item fully back into stock on the Put Away Returns screen.
- View all returned items that need to be put away.
- Scan the item into a bin
How to use the Return items > Request Credit screen
This screen is used to request admin approval for Invoice line items or to submit a request for a custom amount
NOTE: Return eligibility is based on the number of days it has been since the order and your settings for NumberDays in 1place under settings-> sales - > invoice/credit memos->credit memo reasons
NOTE: You also can't do a return for an already pending return request
For non-custom amounts
- Open and login at https://osscan.osonlineorders.com/
- Choose Sales Orders
- Choose Return Items
- Choose Request Credit
- Scan or enter the Invoice Number (This must be the INVOICE number not the SO number), Click Next
- Scan or select the item(s) from the list that are available for return
- Adjust the Return Qty as needed
- Select a reason from the drop down
- Click Request Authorization
An email is sent to the administrator for approval. You will see the pending Credit Authorization
For custom amounts
- Open and login at https://osscan.osonlineorders.com/
- Choose Sales Orders
- Choose Return Items
- Choose Request Credit
- Scan or enter the Invoice Number (This must be the INVOICE number not the SO number), Click Next
- Click Custom Amount
- Enter the Dollar Amount
- Enter the reason for this request
- Click Request Authorization
An email is sent to the administrator for approval. You will see the pending Credit Authorization - Click Proceed to exit
How to use the Return items > Credit Authorization screen
This screen varies depending on the user's access level (admin or non-admin)
Non Admin Users:
This would be used to see all pending credit authorizations, and to see all credits processed by OSScan in the last 48 hour period
- Open and login at https://osscan.osonlineorders.com/
- Choose Sales Orders
- Choose Return Items
- Choose Credit Authorization
- Click Go Back to exit
For Admin Users:
This is used to to approve or decline credit requests
- Open and login at https://osscan.osonlineorders.com/
- Choose Sales Orders
- Choose Return Items
- Choose Credit Authorization
- Click Proceed
- Select whether to Approve or Decline credit requests
If Decline is selected you will need to enter a reason for declined credits and click OK - Click Submit to finish the approval process
Credit memo's are created in 1place and an email is sent to the admin for verification
NOTE: All credit memo's created by OSScan require the Returned quantity to be updated manually in 1place. - Click Go Back to exit
How to use the Return Items > Inspect Return screen
This screen is used when a returned item is received and determined if it is good for stock. An item will be placed in the ReturnsArea bin if it is good for stock
NOTE: the credit memo must be put in the "RA To Inspect" status to proceed
- Scan the item or type it in and click Check Item
- Click Select on the correct item from the list by referncing the Inv # or Ship Via
- Click Good For Stock if it will be returned to stock or Not Good For Stock if it will not be
- Click Done
How to use the Return Items > Put Away Returns screen
This screen is used to take previously inspected return items and place them in a bin
- Select the date range (or keep the default) and click Scan Now
- Scan the item you are putting away
- Scan the bin you are putting it in
- At this point it should be checked off in the list
- Repeat steps 2 and 3 for all items you are putting away.
- Click Done
- Click Done
How to use the Bin Transfer screen
Thisfeature will transfer items from one bin to another.
- Open and login at https://osscan.osonlineorders.com/
- Choose Inventory
- Bin Transfer
- Enter or scan Location # in to the Location field.
- Enter or scan Item # in to the Item field.
- Click Next. (You must enter an actual location and item number above to proceed)
- The next screen will tell you how many of the item you have in that location.
- Choose "All" to move all the items to another bin or choose "Enter Qty" to select how many you want
- If you selected "Enter Qty", enter the quantity you want to move in the box that appears and Click Next
- Scan each of the items you are moving
- Click Next
- Scan the new Location and click Finish.
How to use the Count Items by Bin screen
This feature will reconcile and update quantities in stock as they relate to the Bin location where the items are stored.
This feature will assign a bin of "NoBin" to any items where the bin field in 1place is blank
- Open and login at https://osscan.osonlineorders.com/
- Choose Inventory
- Choose Count by Bin
- Enter or scan bin location
- Click next
- Scan or enter item numbers (for the Bin shown)
- When done, click Review
- Click OK to exit, or Count Another Bin to repeat the process


