Field Mapping--Inventory Item Import - 4 - Item Price Matrix
| Author: Reference Number: AA-01343 Created: 2011-03-01 09:43 Last Updated: 2016-09-14 17:47 |
0 Rating/ Voters
|
     |
Overview of the Inventory Item List - Price Matrix Template
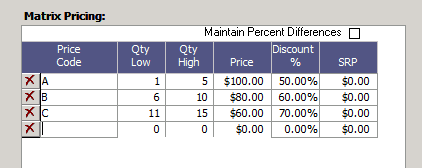
OneSource provides many different ways to 'Price' items. One of these ways is to create a price matrix for many (or all) of your items. An example of the Price Matrix for ItemX is shown in Figure 1 below. In this example ItemX has 3 price levels:
Price Code A for $100,
Price Code B for $80,
and Price Code C for $60.
(Note: The user could actually enter more codes if desired, and could also change each Price Code name to something else).
The bottom line is you wanted to have 3 price codes for ItemY, like in the example below, you would need to have 3 records in the spreadsheet--1 for each Price Code. (The section below shows what those 3 records would need to be to import into the matrix properly).
Figure 1 - Price Matrix for ItemX

Spreadsheet Template Example of Column Headings and Data
|
ItemNumber |
PriceCode |
Price |
QtyLow |
QtyLow |
AdjustPrecent |
|
ItemX |
A |
$100 |
1 |
5 |
50% |
|
ItemX |
B |
$80 |
6 |
10 |
60% |
|
ItemX |
C |
$60 |
11 |
15 |
70% |
|
Item123 |
A |
$50 |
|
|
|
|
Item123 |
B |
$45 |
|
|
|
|
Item123 |
C |
$40 |
|
|
|
|
ItemZZZ |
A |
$150 |
|
|
|
Additional Notes about the Fields
- ItemNumber: This field is Required. This is the field that much match up with an item # in the OneSource Inventory table (to link the two tables together).
- PriceCode: The price code name might be something like A, B, and C, etc. (Or 1, 2, 3, or names like Wholesale, Retail, etc).
- Price: This is the price that will be inserted into the Quote, Sales Order, or Invoice
- QtyLow: This is an optional field if you decide to use the Pricing Method called Matrix by Qty. The following big picture explanation might help you understand how the Matrix Pricing table works in relation to the following 2 pricing methods:
- OPTION 1 - Matrix by Code: Suppose you want certain (or all) customers to always get a certain price code on the items they buy. In this case you could do this by creating a Pricing Matrix (like the one in Figure 1 above) for certain (or all) items--with different Price Codes, such as A, B or C (like in Figure 1 above). Next you would assign certain (or all) customers to have a Default Pricing method = 'Matrix by Code', and then assign each customer with the Code you want them to have, such as A, or B, or C. In this example, if Customer X had a default price code = B then (using the example pricing matrix above for Item X above) you can see that they would automatically get the price of $80. Note: If this is how you wanted to make use of your pricing matrix you could LEAVE the QtyLow and QtyHigh fields empty.
- OPTION 2 - Matrix by Qty: Another Pricing Matrix option is Matrix by Qty. Matrix by Qty is just like Matrix by Code (above) except you would change the Default Pricing method (on the customer record) to Matrix by Qty. (Note: In this case you will NOT need to pick a particular price code for the Customer record as each customer's price will vary, at the time of the Quote or Order, depending on the QTY they price or buy). For example, if Customer X had a Default Pricing type = Matrix by Qty and called in to place a Sales Order for 11 of ItemX (assuming the pricing matrix shown in Figure 1 above) the price would auto calculate on the Quote or Sales Order as $60.
- QtyHigh: See the explanation for QtyLow above.
- AdjustPercent: This field is used to help you auto calculate the Price Code (if desired) as a percentage off the List price of the Item. For instance, using Figure 1 above, the List Price of ItemX (on the Inventory Management screen which is not visible) is $200. In this case if the user had entered a 50% Discount % the $100 would have been auto calculated. This field is not required.
|
